


![]()
Reassembly
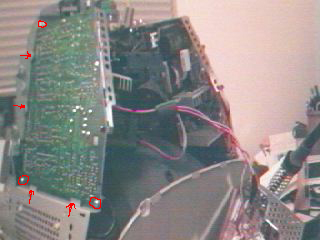
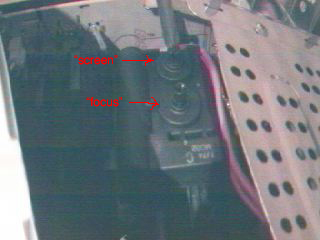
25. With the computer face down, line up the front edge (now down) of the board next to (not in yet) the slots in the frame that it sits in. This will make it easier to plug all the cables back in. Reconnect P504, P514, P703, P701, P702 and P506 (easiest in that order). Remember that each connector has a unique shape and orientation so you virtually can not screw it up. If you have a Rev. 1 board, reconnect P508, P514, P502, P505, P506 and P702 (easiest in that order). After all connections are made, slide the board into the slots (marked with red arrows in picture) that support it in front and on the bottom then secure it with the three screws (circled in red).
26. On the video board, reconnect P303, P301, P305 and the ground (easiest if done in that order). If you have a Rev. 1 board, you also need to reconnect P302. Again, each connector is unique in its shape and orientation. The exception here is P305, which could be connected two ways, 180 degrees difference. It doesn’t matter either way since this runs a loop of wire around the CRT. Once all connections are made, gently push the video board onto back of CRT (only lines up one way, which will be obvious).
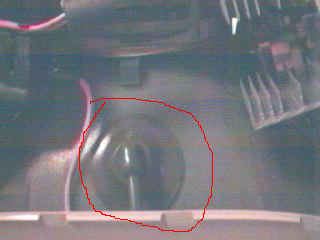
27. Reconnect the FBT to the CRT cathode. You need to insert one side of the clip into the CRT cathode then push in the other side with a screwdriver or pliers. Be careful not to slip and hit the CRT with the tool, you may crack or break the glass.
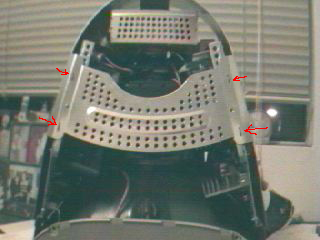
28. Replace the EMI shield by lining up the four slots (red arrows in picture) on top with the tabs on the iMac frame. Do this first as a guide to make it easier (still not easy) to line up the screw holes on the rest of the shield. Replace the 10 screws that secure the EMI shield.

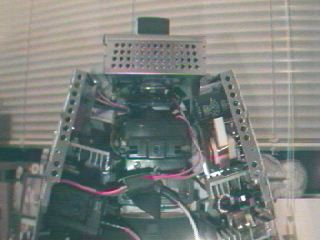
29. You need to reconnect the chassis that contains the logic board, CD-ROM, hard drive, etc. There are four metal hooks on the chassis that slide into place under the CRT. Once you have the chassis in place, secure it with the two screws (marked in red in picture) at the back end. Reconnect the audio, power and video (easiest in that order) cables. If you have a Rev. A or B iMac you also have an IR cable. It is not necessary to connect the IR cable at this point, but you can if you wish.
30. Set the iMac upright. Plug it in and push the power button. This is the moment of truth. The iMac should boot up (assuming nothing else is wrong with it, i.e. bad memory, missing hard drive etc.). If the iMac still fails to boot in the same manner before as the repair (i.e. it turns off just after the light turns from orange to green) then there is still something wrong with the FBT. I have never had that happen though. You might want to double check your solder connections.
While the iMac is booting, you still may not get any picture yet and if you do it will likely be blurry. In either case, don’t panic. Wearing your safety glasses and electricians gloves, use a screw driver to adjust the two small knobs on the FBT that are facing up. Adjust the screen knob first if you don’t see any picture. This will adjust the brightness (worry about fine-tuning it later). Once you see the picture, adjust the focus knob to focus the screen.
Once the iMac has completely booted, plug in a mouse and use the monitors control panel to set the brightness to the middle setting. Then adjust the screen knob again to a comfortable brightness. Slide the brightness control in the monitors panel all the way up and all the way down to be sure the monitor gets too bright and too dark. You want to have the screen knob adjusted so you have a wide working range of brightness control settings in the control panel.
Now shutdown the computer, unplug it and remove the chassis again.
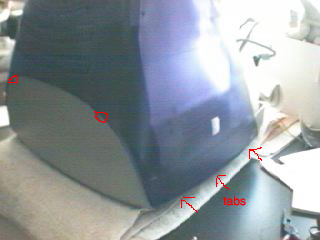
31. Replace the top outer case, sliding in front side tabs. Secure it in place with two screws (circled in red) then cover the screws with the screw plugs. When inserting the screw plugs, it is best to insert the inside edge tab first, then press down on the outside edge tab.
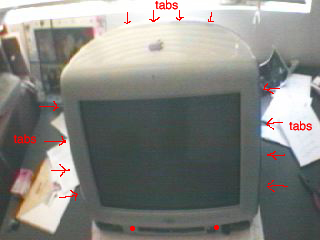
32. Set the iMac upright. Slide the top tabs of the front outer bezel into the top outer housing. Then tap in the side tabs gently with your hand. Secure the bezel in place with two screws in front.

33. Set the iMac back down on its screen. Thread the audio, video and power cables through the opening of the bottom housing. Set the housing in place and secure it with eight screws. The two top-most (back) screws are small as are the two bottom-most (front) screws. The four screws along the sides are the bigger screws.
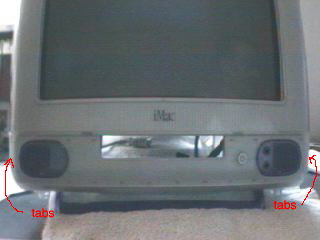
34. Set the iMac upright. Replace the front lower bezel by inserting the tabs on the topside under the bottom of the front outer bezel. Then slide the big tabs on the bottom into the bottom housing. You will likely have to bang on the sides of the front lower bezel with your hand to get the small tabs (marked in picture) to lock into place.
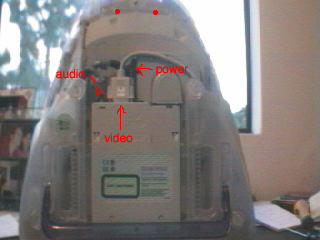
35. Set the iMac face down again. Slide the chassis into place and secure it with two screws (market in picture). Reconnect the audio, power and video cables (in that order is easiest). If you have a Rev. A or B iMac you’ll need to reconnect the IR cable as well.
36. Replace the bottom cover, snapping it in place. Secure the bottom cover with one screw (marked in picture).
37. Plug in the iMac and boot it up. You now have a functioning iMac (Note: the screen flickering in the movie clip is an artifact of filming the iMac or any other monitor with a web-cam, there is no flickering noticable to the naked eye).
Questions or comments can be directed to me via this form.
<Previous Introduction Disassembly Repair Reassembly![]()