


![]()
Disassembly
The pictures and details in the following procedure are from a Rev C (266 MHz) iMac. There may be small differences in the details between iMacs Rev. A-D. I have also performed the same fix on Rev. A and B iMacs and will provide alternate details when necessary. The Rev. D iMacs should be virtually identical to the Rev. C (except for the faster processor). The only major differences you need to be concerned with is the video and analog boards. There is a Rev. 1 (Apple P.N. 661-2080) and Rev. 2 (Apple P.N. 661-2166) analog/video board pair. If you decide to make this repair, make sure you replace the boards with the same revision number or it will not work since other parts of the iMac meant to work with the video and analog boards will be incompatible.
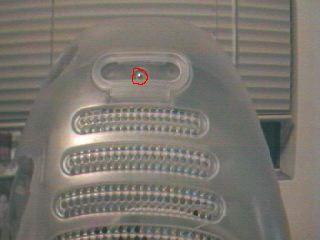
1. Set the computer face down on a towel (or blanket) to protect the screen. Any time you have the iMac face down throughout this repair, you want to place it on a towel or blanket. Unscrew the single screw (circled in picture) from the bottom cover and remove it by pulling out and up on the handle. I find the best way to keep track of where a screw came from is to tape it to the part in or near the hole it came out of with some scotch tape. I would recommend doing this for each step in the procedure that requires removing screws.
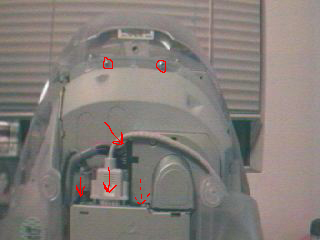
2. Remove the two screws that hold the carriage in place. Disconnect the video, audio and power cables (solid arrows). Rev. A and B iMacs have an IrDA cable (dashed arrow) that needs to be disconnected as well.
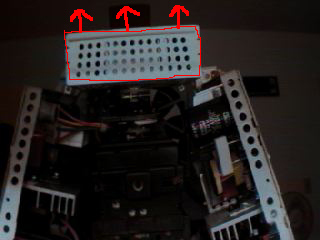
3. Remove the carriage by pulling up on the handle.
4. Flip the iMac so that the bottom side is up. Push down and then out on the two tabs that lock the lower front bezel to the bottom outer case. Pull off the lower front bezel. You will likely have to pry off the sides with a small slotted screwdriver or plastic blade.
5. Set the iMac on its screen again. Remove the eight screws that secure the bottom outer housing and remove it.
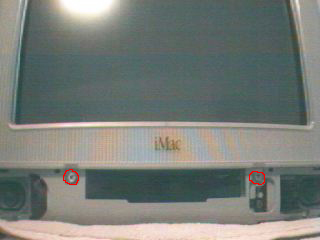
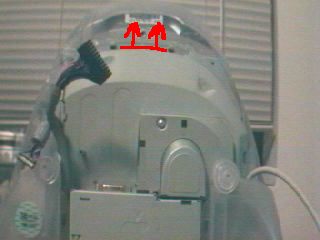
6. Set the iMac on its bottom. Remove the two screws that secure the front outer bezel. Remove the front outer bezel by lifting up and pulling out the tabs that lock it into the top outer housing. You may need to use a small slotted screwdriver or plastic blade to pry the tabs apart.
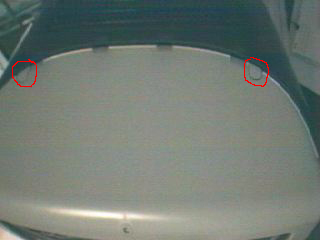
7. Remove the two screw plugs on top of the iMac by carefully lifting the outside edge of each one with your slotted screwdriver or plastic blade. There are delicate tabs that lock the plugs into place. Try not to force it or they might break.
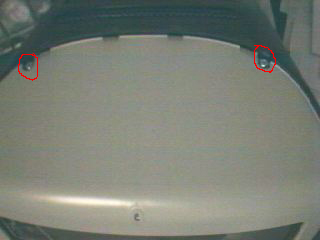
8. Remove the two screws that were below the screw plugs. Lift off the top outer housing by sliding the outer-front edges up and lifting the cover off.
9. Put on the electricians gloves. Do not proceed without doing this. You will now be working around the CRT, which can potentially hold thousands of volts of electricity. If you accidentally discharge any stored voltage with your body, you will likely suffer very serious injury and possibly death. To reduce the possibility of the CRT having stored voltage, you should leave the iMac unplugged for at least 3 days before going any further. Even after this period of time, high-voltage may still be stored in the CRT so proceed as though it were. There is also the potential for the CRT to be shattered. You should already be wearing safety glasses, but if not put them on NOW.
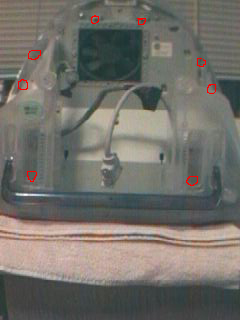
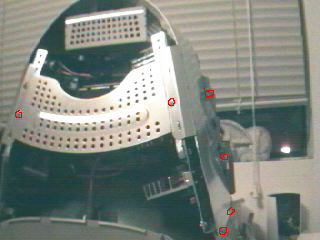
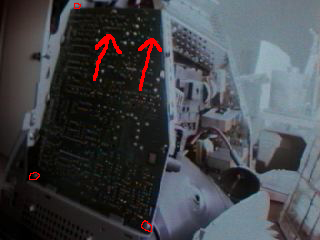
Remove the ten screws that hold down the EMI shield. There are only six circled in the picture, but the other four are located on the unseen side in identical locations as those shown. Lift off the EMI shield.
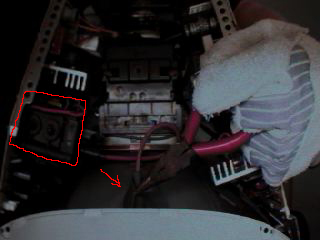
10. With electricians gloves and safety glasses still on, carefully use a pair of needle nose pliers to lift the rubber cap (see red arrow) that covers the cathode connection to the CRT. In the picture, you can see also the FBT (traced by a red square).
11. Ground the #0 Phillips head screwdriver using some heavy gauge wire. With electricians gloves and safety glasses still on, touch the tip of the grounded screwdriver to the metal connector underneath the rubber cap to discharge the CRT. Make the contact for several seconds and do it several times to ensure you have discharged it.

11B. Disconnect the FBT cathode from the CRT by pressing on one side of the connector and gently pulling on the wire. Now you can remove the electricians gloves.
12. Set the iMac face down and remove the video board from the end of the CRT by pulling gently but firmly up. Do not twist or torque the connection or you may break the CRT.

13. Disconnect the ground and the connectors labeled P301, P303 and P305 from the video board. Don’t concern yourself with having to reattach them later. Each connector only fits into its own plug and only in the proper orientation except for P305, which is orientation independent. In other words: you can’t screw it up. Note also that the picture shows the Rev. 2 video board. The Rev. 1 board has a slightly different layout with P301 across from P303 instead of on top of it. Also, the Rev. 1 video board has another multi-wire connector labeled P302 between P301 and P303 that also needs to be disconnected.
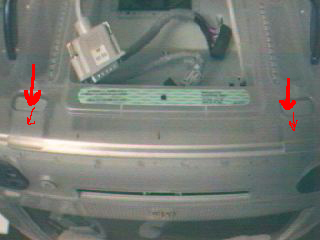
14. Remove the three screws that hold the analog board in place then lift it out of the frame.
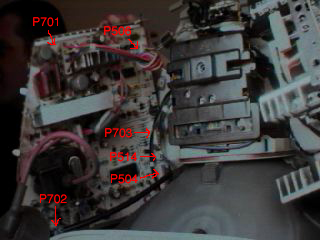
15. Disconnect the plugs labeled P504, P514, P703, P506, P701 and P702 from the analog board. Just like with the video board, you need not be concerned with which plug goes where or its orientation, each has its own unique shape and size. Pictured is the Rev. 2 analog board. The Rev 1 analog board has no P504 or P703 but instead has P502 and P508, which needs to be disconnected. At this point, if you have decided to replace the analog and video boards instead of just replacing the FBT, you can skip ahead to the section that describes how to reassemble the iMac.
![]()