


![]()
Processor Module
Word of caution: the G3/G4 processor cores are exposed cores, otherwise known as "flip chip" processors. It is very possible to crack or chip the core if care is not used in mounting the heat sink. This can and will lead to processor failure. Use extreme caution and do not put much force on the core. Only enough force needed to give slight contact between the heat sink and core should be used.
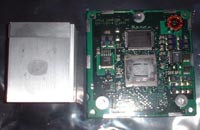
Below you see a typical G4 processor module. It secures to the logic board using screws that mount directly to the swing door on the G4 cases. If you aren't going to use the G4 case, you'll need to remove the two post and screws that hold down the modem, and move them to two of the three holes in the logic board around the CPU connector. As you can see, there are a variety of components around the actual CPU. This will be important if you decide to customize you own active cooling solution.

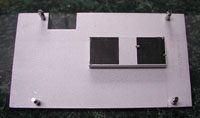
This is the bottom of a dual processor heat sink. As you can see, there's four posts and a raised area with thermal tape on it. The single processor heat sink is not as wide and only has one black thermal tape patch on it. Since I didn't want to spend between $40-$80 for the heat sink, I decided to make my own from some PC parts. Note that because of the design, the dual processor heat sink will not fit on the single processor module.
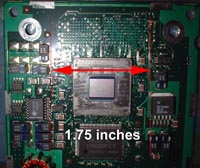
Here is a close up photo of the area around the actual CPU. Note the location of the components. The clearance is only 1.75 inches. This makes choosing a heat sink/cooling solution very challenging. Fortunately, in my spare parts box, I had a Celeron heat sink and fan. Upon making a test fit the clearance was perfect.
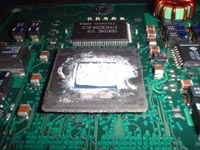
The first thing to do is to prepare the thermal cooling solution. I used a little Arctic Silver that I had around and put about half a pea sized amount on the top of the CPU. Then I used a small piece of paper to gently cover the top of the CPU core with the thermal material. Normally, you put the thermal compound on the heat sink first, but due to the space constraints, it makes more sense to put it on the CPU first and then transfer it to the heat sink. If you decide to use the silver-based Arctic Silver compounds, please note that you shouldn't get the compound on anything other than the core. Since there's a protective coating over the rest of the CPU, and because I didn't use a silver based compound, there's no worry of getting the compound a little outside the core. The excess compound was wiped off prior to final assembly.
After putting the grease on the CPU core, it's time to transfer it to the heat sink. In this case, I gently put the heat sink on top of the core and lifted the heat sink up and down a few times, sort of the same way you might use a wet paint brush to put splatter effects in wet paint. Be careful here as the clearance around the CPU core is very tight and it is possible to damage or remove components near the core.
This is how it looks once the thermal compound has been transferred to the heat sink bottom and given a rough tacky surface. This will ensure filling the gaps once the heat sink and CPU are mated.
Now that the CPU grease has been spread, it's time to mount the heat sink. If you are using the stock Apple heat sink, there are four holes on the CPU module where the heat sink will mount. Then, you snap on two metal clips to secure the heat sink down. If you are using the Apple heat sink, the large fins go towards the back of the CPU module (where the single screw hole is located).
Otherwise, the four holes can be used to mount the custom solution. I simply got three wire ties and fabricated a triangle. Upon doing this on both sides, the heat sink (sans fan at this point) was mounted, the wire ties navigated to go down the channels between the fins, and the wire ties were tightened enough to securely mount the heat sink.
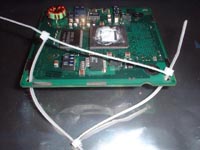
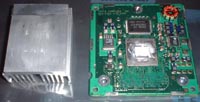
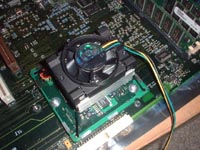
Below is the finished product. The fan is mounted and the heat sink is secure without putting undue pressure on the CPU core.
-
Main project page.
-
Places to obtain parts.
-
Brief look at the various models of G4 Power Macs.
-
Processor module and heat sink fabrication.
-
Quick look at the logic board.
-
Installing the parts in the case.
Next page: A close up look at the gigabit logic board.
Prior page: Vendors and choosing parts.
![]()